Windows 7 inherits the capability to burn or write to CD and DVD burner or writer, with additional support to directly burn ISO and IMG disc images with Windows 7 Explorer. With disc burning support, Windows 7 also continue feature automatic CD or DVD tray ejection.
When a system is equipped with CD or DVD burner, Windows 7 automatically support burning of data files and ISO or IMG image files to CD or DVD disc media. Windows 7 will also automatically eject the CD or DVD drive tray when user double clicks on the optical drive in Windows Explorer or when user single clicks on the optical drive in the File Save or File Open dialog box.
For user who already installs third-party burning software such as Ashampoo Burning Studio 2009 Advanced or Nero 9 Essentials Free Edition, the built-in burning capability of Windows 7 may not be needed. Beside, some administrators may want to restrict ability to burn and write data to DVD or CD disc media in line with company policy. Some user may also prefer to stop and prevent auto ejection of DVD or CD drive disc tray, especially when there is a lid outside the drive that locks the tray to keep it closed.
Both ability to disc burning and auto-eject disc tray for a DVD or CD burner goes hand-in-hand or links together. It’s impossible to prevent or stop Windows 7 from ejecting the CD or DVD optical drive when click. But when burning support is disabled or removed, both features are both turned off.
How to Disable and Turn Off CD or DVD Burning Support and Stop Disc Tray from Auto Eject in Windows 7
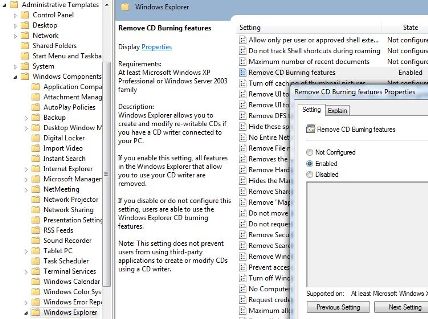
- Run gpedit.msc (Group Policy Editor) from Start Search.
- Expand Local Group Policy -> User Configuration -> Administrative Templates -> Windows Components.
- Select Windows Explorer.
- In the right pane, double click on Remove CD Burning features.
- Select Enabled radio button to stop and disable all features in the Windows Explorer that allow users to use their CD writer to burn, and ability to auto eject disc tray. Click OK when done.

- Restart computer or log off and log on again for the change to take effect.
- To reset and re-enable the CD burning feature in Vista, simply choose back the setting to Not Configured or Disabled.
Some editions of Windows 7 doesn’t have Group Policy Editor. In this case, manually change the CD burning feature support in the registry. To do so, run Registry Editor (regedit), and then navigate to the following registry key:
HKEY_CURRENT_USER\Software\Microsoft\Windows\CurrentVersion\Policies\Explorer
In the right pane, if it’s not already existed, right click on a blank space, and select New to create a new DWORD (32-bit) Value. Name the new value name as NoCDBurning, and assign its value data to 1.
![]()
To reset and turn back on CD burning feature, delete the NoCDBurning value, or set its value data to 0.
Alternatively, simply download the DisableEnableCDBurning.zip ZIP archive, which contains two registry files – EnableCDBurning.reg and DisableCDBurning.reg. Simply double click on DisableCDBurning.reg to merge its value to registry to remove CD burning feature, or double click on EnableCDBurning.reg to restore the CD burning feature. Restart or re-logon for the change to effective.
Check out more tips and tricks on usage guides of Windows 7.
Recent Posts
- Able2Extract Professional 11 Review – A Powerful PDF Tool
- How to Install Windows 10 & Windows 8.1 with Local Account (Bypass Microsoft Account Sign In)
- How to Upgrade CentOS/Red Hat/Fedora Linux Kernel (cPanel WHM)
- How to Install Popcorn Time Movies & TV Shows Streaming App on iOS (iPhone & iPad) With No Jailbreak
- Stream & Watch Free Torrent Movies & TV Series on iOS with Movie Box (No Jailbreak)
 Tip and Trick
- How To Download HBO Shows On iPhone, iPad Through Apple TV App
- Windows 10 Insider Preview Build 19025 (20H1) for PC Official Available for Insiders in Fast Ring – Here’s What’s News, Fixes, and Enhancement Changelog
- Kaspersky Total Security 2020 Free Download With License Serial Key
- Steganos Privacy Suite 19 Free Download With Genuine License Key
- Zemana AntiMalware Premium Free Download For Limited Time