Combine and Merge Photos to Create Group Composite Image with MSR Group Shot Free Download
Do you ever want to combine or merge a few photos or pictures together to build and create a composite image that uses parts or regions that you specified from each photo, but think that the image manipulation tool such as Adobe Photoshop, Corel Paint Shop Pro or Serif PhotoPlus is too complicated and difficult to use? Group Shot developed by Microsoft Research is a photo imaging tool that intends to make easy that task of creating a perfect combined group photo out of a series of group photos.
Microsoft Research (MSR) Group Shot helps you create a perfect group photo out of a series of group photos. In other words, Group Shot enables you to create a composite image from a series of photos by selecting your favorite parts or regions in each shot of the image series and Group Shot will automatically build a composite image. The idea is that you take similar pictures taken from the same place and combine them together to give the best one.
To get the best result from Group Shot, the photos must be of the same scene, taken from the same point of view within a short period of time, and are of same group of people, with no major change on exposure settings between shots. Minor view changes are fixed when the images are loaded, as the Group Shot tries to align each image. Beside, all original images to merge or combine must all be the same size too, as the Group Shot will merge and combine by fixed region or part of the photos. You’re recommended to use imaging tools such as Microsoft Office Picture Manager to crop or resize the images to the same dimension or resolution if images are different sizes or dimensions. So Group Shot is especially useful is you always use continuous shoot to take several photos on a single shot to get the best possible results.
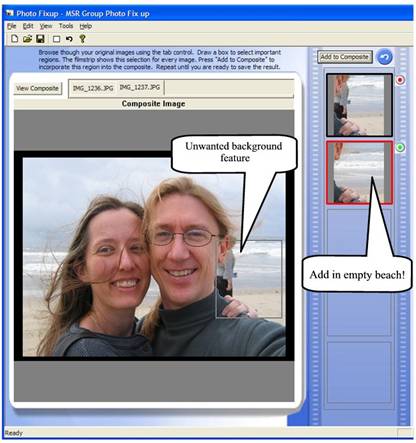
One best application of the Group Shot is to remove the unwanted background of the photo, if you have multiple photos of the same area. You can get rid of unwanted background features by selecting better features in another image.
Download Group Shot for Windows XP for Windows XP version 1.03 here (download is no longer available). If you’re using Windows Vista Ultimate, Group Shot will be released as a free add-on in Ultimate Extras (not available in the first release), which can be downloaded via Windows Update.
Group Shot Usage Instruction (How to Use Group Shot)
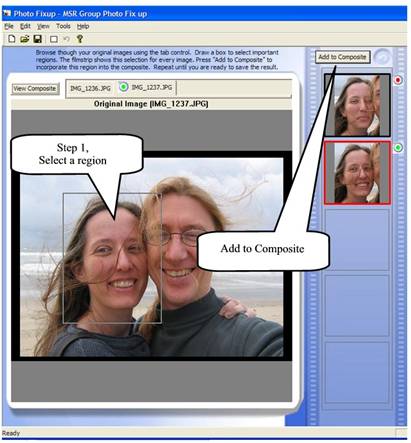
1. Import a series of photos and images to Group Shot
Import a set of images to Group Shot. A set of images can be imported from the File Import Images menu or by dragging and dropping files from the File Explorer. Files can be added either as a set or one image at a time. Once you have loaded a series of images, you can view each individual image by using the tab strip at the top of the main window.
2. Creating a Composite
Build a composite by selecting a region on an original image and adding it to the composite. You can select a region by dragging a rectangle on an image. Once you select a region, the contents of that rectangle on each of all original images show up on the filmstrip on the right.
Select the rectangle in the filmstrip that looks best and click on “Add to Composite” or simply double click on your selection). This instructs the program to incorporate the selected region to the composite image. New composite image will be generated in a few seconds.
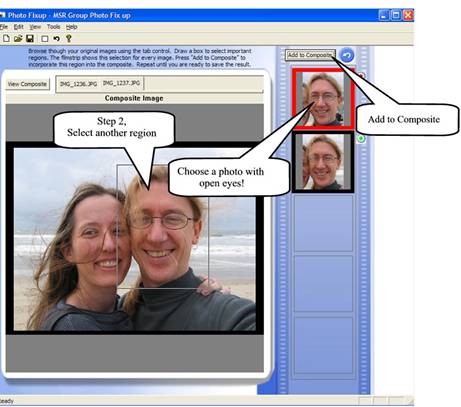
Continue by selecting a new rectangle in the composite (Group Shot will automatically apply to selection to all original images on the same area and display the area on filmstip on the right), or by selecting a rectangle in an original image. Note that the location of rectangle or region you selected is fixed and cannot be changed or moved. It means that where a region is located on the original image, it will appear on the same location in the composite image. That’s why a series of the similar or almost same photos are best for Group Shot. You can use the tab interface to look at your original images. Once again, select the rectangle in the filmstrip that looks best and click on “Add to Composite”, and wait for a few seconds for new composite image. Note that the composite image is only made up of regions from images that you have selected.
3. Undo a Change
If you not satisfy or not happy with the latest change, click on Undo button next to the “Add to Composite” button to revert back the change.
4. Save the Composite Image
Save the results or the combined and merged photo by selecting the File Menu and then click on “Export Full Resolution Composite” to generate and create best quality image. Wait a few seconds to the image export to complete. For lower resolution picture at 640×480, select “Save Low Resolution Composite”.
MSR Group Shot is planned to release as an incentive program for Windows Vista Ultimate users as part of the “Ultimate Extras” add-ons package once it’s ready in the future, and Bill Gates has showcased a sneak preview on Group Shot features and capability during his keynote in 2007 CES.
LK is a technology writer for Tech Journey with background of system and network administrator. He has be documenting his experiences in digital and technology world for over 15 years.Connect with LK through Tech Journey on Facebook, Twitter or Google+.


 Concurrent Capable and Big vg Format Volume Group in AIX Unix")

