If you own an Asus P5B Deluxe or Asus P5B Deluxe/WiFi-AP motherboard which using AMIBIOS, although since BIOS update release version 0910 has built-in support for SLIC table in APCI module, but OEM edition of Windows Vista couldn’t be activated automatically even though with valid OEM product key and Asus OEM certificate. It’s likely due to unmatched OEMID and OEMTableID in the SLIC and RSDT tables of ACPI module with the leaked OEM certificate. So some modification of AMIBIOS in ASUS mobo is needed.
A hacker has released a modified version of BIOS for Asus P5B Deluxe and Asus P5B Deluxe/WiFi-AP mobo which self claimed as perfect BIOS for the motherboard based on latest BIOS release version 1004. The perfectly modified v1004 Asus BIOS is extracted from BIOS again by using EZ Flash 2 to backup the modified BIOS that proved to be working, and supports RAID functionality.
Warning: Alteration to BIOS may invalidate warranty, cause computer to unable to boot up or other irrecoverable effect. Do it at your own risk.
Method 1 – Recommended
- Download the cracked P5B Deluxe Release BIOS 1004 P5BD1004C.ZIP which support SLP 2.0 Vista OEM Activation by using publicly available OEM product key and certificate.
- Extract P5BD1004C.ROM from the archive and put it on hard disk.
- Reboot computer and boot into BIOS.
- Select Tools.
- Select EZ-Flash2.
- Flash the downloaded BIOS into ROM.
- Install Windows Vista. Do not enter any product key. If you’re already install Windows Vista, skip this step.
- Download ASUS OEM certificate ASUS.xrm-ms and put it on C:\ root directory.
- Install the digital certificate by using following command in command prompt:
slmgr.vbs -ilc C:\ASUS.xrm-ms
- Input and change the Windows Vista product key to the Asus OEM product key by using following command in command prompt:
slmgr.vbs -ipk <new product key>
ASUS OEM key for Home Basic: XXXXX-XXXXX-XXXXX-XXXXX-RJC9V
ASUS OEM key for Home Premium: XXXXX-XXXXX-XXXXX-XXXXX-RPFFV
ASUS OEM key for Business: XXXXX-XXXXX-XXXXX-XXXXX-VVMP9
ASUS OEM key for Ultimate: XXXXX-XXXXX-XXXXX-XXXXX-932CC
Note: This BIOS must be flashed by using EZ-Flash 2 utility in ASUS BIOS. In future BIOS firmware upgrade, theoretically users can opt to upgrade BIOS from Windows by using ASUS Update V7.09.02 or above, as some of the data including the important SLIC string is static and won’t be replaced by new BIOS.
Method 2 – Manual Way
If you prefer to modify the ASUS BIOS yourself, try the following steps which originally tested on ASUS P5B-D with Sensor/Northbridge of WINBOND W83627DHG or C2 version. This tutorial should also works on ASUS P5B-E Plus motherboard:
- Backup, export or save BIOS of the ASUS P5B-Deluxe or ASUS P5B-Deluxe/WiFi-AP motherboard. You can download the latest BIOS firmware for your motherboard directly from ASUS website too. In this example, assuming the BIOS file saved is named A1004-00.ROM.
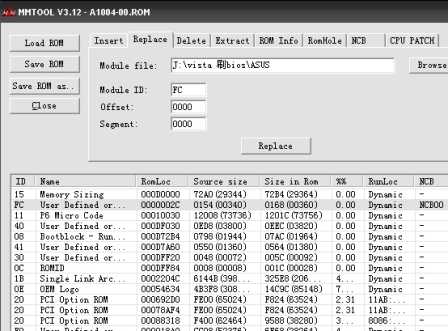
- Download and install MMTool v3.12, an AMIBIOS editing tool.
- Launch MMTool and open or load the BIOS ROM file saved in step 1.
- In the ID column, locate the module ID of FC.
- Click on the “Replace” tab.
- Click on the Browse button, and select the ASUS file that contains byte code to replace the FC section of the BIOS, and then click on Replace button.
- After replacing the FC section, click on “Save ROM as..” button, and save the replaced BIOS ROM as a file with another name (for example as A.ROM).
- Restart computer.
- When computer boots up, press Alt + F2 to access ASUS EZ Flash.
- Flash (write) the just saved BIOS ROM file (A.ROM) into the BIOS.
- Restart computer again when done.
- BIOS will display error or damage when the computer boots up. This shouldn’t cause any problem as only FC module is edited and altered, and not BIOS BOOT module which remains intact. So the error message can be safely ignore. Press F2 to accept default value to boot up to Windows XP.
- Once log onto Windows XP, use ASUS Update V7.09.02 to flash the original BIOS ROM file that hasn’t been modified (A1004-00.ROM) to repair the BIOS. This flashing will not overwrite the FC module that previously been replaced, so the modification of FC module will remain intact.
- Reboot system. You may want to set your BIOS configuration and options again.
- Install Windows Vista. Do not enter any product key. If you’re already install Windows Vista, skip this step.
- Download ASUS OEM certificate ASUS.xrm-ms and put it on C:\ root directory.
- Install the digital certificate by using following command in command prompt:
slmgr.vbs -ilc C:\ASUS.xrm-ms
- Input and change the Windows Vista product key to the Asus OEM product key by using following command in command prompt:
slmgr.vbs -ipk <new product key>
ASUS OEM key for Home Basic: 762HW-XXXXX-XXXXX-XXXXX-XXXXX
ASUS OEM key for Home Premium: 8XPM9-XXXXX-XXXXX-XXXXX-XXXXX
ASUS OEM key for Business: 72PFD-XXXXX-XXXXX-XXXXX-XXXXX
ASUS OEM key for Ultimate: 6F2D7-XXXXX-XXXXX-XXXXX-XXXXX - Windows Vista should be activated automatically.
Method 3 – Simplified Manual Method
If you don’t want to extract or modify the BIOS yourself, here is the ASUS_P5BD_ROM.zip that contains both the modified version of BIOS (A.ROM) and original BIOS (A1004-00.ROM) that you can use straight away to flash the motherboard’s BIOS. Simply follow the simplified steps after downloading the zip file:
- Place the modified BIOS file (A.ROM) on the local hard drive.
- Restart the computer and boot into BIOS.
- Use the BIOS EZ-Flash utility to flash the A.ROM into ROM.
- Restart the computer and Load Default to boot into Windows.
- Use ASUS Update V7.09.02 or above to flash A1004-00.ROM into BIOS.
- Install Windows Vista, import OEM cert and change to OEM key as mentioned in the remaining steps on Method 2 above.
Disclaimer: This article is for information and educational purpose only.
 Tip and Trick
- How To Download HBO Shows On iPhone, iPad Through Apple TV App
- Windows 10 Insider Preview Build 19025 (20H1) for PC Official Available for Insiders in Fast Ring – Here’s What’s News, Fixes, and Enhancement Changelog
- Kaspersky Total Security 2020 Free Download With License Serial Key
- Steganos Privacy Suite 19 Free Download With Genuine License Key
- Zemana AntiMalware Premium Free Download For Limited Time